It’s weekend and you might be wondering what to treat yourself with and how to satisfy your sweet tooth? Well, don’t you worry, cause I’ve got you covered. These chocolate raw balls are so delicious, they are nut free, dairyfree, vegan, glutenfree and refined sugar free! It got a rich chocolate flavor, with a hint of coffee and a yummy crunch from the buckwheat! The recipe is from talented Tiril Refsum, in her book “Rågodt”.
These are perfect to make on a Sunday as you can save them up for the week when the hangry mood strikes or you need a quick snack in between your busy schedule. Also not a bad idea to reward yourself with a treat after a good long day of work either;)
The ingredients you’ll need are simple:
• Dates
• Shredded coconut
• Cacao powder
• Espresso shot (2 tbsp) or 1 tsp of coffee powder
• Coconut sugar / brown sugar (if you don’t have any of ingredients play around with honey or maple syrup but then see with the consistency of the dough)
• Salt to enhance the chocolate flavor
• Whole buckwheats
Just mix all ingredients in a food processor except the buckwheat until the dough becomes sticky. Then you can add in some buckwheat to your preferring and pulse lightly with the food processor so that it’s mixed with the dough. After you can roll them into balls and cover them with either cacao powder or shredded coconut.
As this is a recipe from the book of Tiril I won’t share the exact measurements but the ingredients are there for you to try it out and make the delicious healthier treat/snack.
Refrigerate them after you have rolled them into balls! Then after 30 min, you can enjoy them;)Keep them in an airtight container in the fridge and they last for a week:)
I mean, who doesn’t love cinnamon buns? Silly question I know cause the answer is yes to the majority. Anyways, I wanted to make a different kind this time, trying cardamom and orange! Now who loves that kind? Me! And so will you when you bake them. It resulted into a new favorite as it got so much flavor. It’s definitely a blissful moment taking that first bite as it warms your soul with a hug, indeed a necessity these days when it’s minus 13 here in Oslo. So there is my argument for baking these goodies, it will only do you well. And even if it’s not that cold where you are, let’s remind us that these are also healthier as they have no refined white sugar in it, nor butter or dairy milk! I guess i have convinced you enough, so let’s get to it!
• 2-3 tsp apricot and orange jam (I found out that I took a bit too much of the jam when trying to form them as knots, can be a bit messy so you can choose to either skip it or try with just a little)
Top it with shaves almonds! It’s optional but it gives it a good crunch and they just get more irresistible, aaand prettier.
Instructions
1. First add warm almond milk and water to a bowl at lukewarm temperature. Then add the rest of the ingredients, but first start with the yeast and let it rest about 10 minutes before mixing all together.
2. Next step is kneading the dough for approx. 10 minutes if you have a breadmaker. If not do by hand but it might take you longer to knead the dough well. It should be elastic and shaped into a loose ball. In case it’s too sticky, add more flour until the desired consistency mentioned above.
3. Up next is to let your dough rise to doubled size around an hour covered with damp cloth.
4. When the time has passed, sprinkle some white flour to the surface so it’s easier to roll the dough. Use a wooden or marble rolling pin to do the process until you have shaped a nice rectangle!
5. With room tempered dairy free butter, spread it with a spoon equally across the surface. After that add your filling and do same procedure.
6. Fold the dough into 3 parts, one side meets the middle, while the other side does same and at last fold it over for the third time into one piece.
7. Cut the dough into 12 to 13 equally sized smaller rectangles. Then form them into knots tying them together. Let them rest for 45 minutes covered in cling film for them to rise one last time.
8. Bake them until golden brown and soft in the middle on 180 degrees fan oven for about 20 minutes!
Enjoy everybody and comment how it went or if you have any questions/doubts on how to make them.
With love & care, Melanie x
Vegan, dairyfree & refined sugarfree.. Instead with coconut sugar!
Let’s get into some snack bar goodness. Aaand feel the autumn vibes by the aroma and flavors it gives with credit from a beautiful superfood mix by yoursuperfoods. These are gluten free, dairy free and refined sugar free, only doing you good! I often recognize when the hunger hits and you want to find a healthy snack around the corner, that it’s not easy to stay strong and you give in when all you can find is a sugary bar or you decide to starve yourself until you get home. No option is recommended.. That is why I’ve got you covered with these healthy snacks on the go when feeling hungry! Make them ahead and have one ready in a box in your bag when the need for a bar is there.
Say goodbye to unhealthy and sugary snacks, and say hello to healthy homemade fall inspired bars:)
Ingredients
1,5 cup gluten free oats
1 cup almond flour (or any other kind if you don’t have it)
1 cup dairy free milk (I used oat milk)
1,5 cup pumpkin purée *
3 tbs maple syrup or honey
1/4 cup melted coconut oil
1 egg (if vegan make flax meal egg)
2 tbs chia seeds
1 tsp mellow yellow superfood mix
1/2 tsp baking powder
1/4 tsp baking soda
1/4 tsp salt
Instructions
*How to make pumpkin purée. Peel off the skin from the pumpkin and cut it into squares. Put the oven on 220 degrees and bake them on a baking tray for about 30-40 minutes. Cool them on a board before having it in a food processor. Blend well so it’s smooth without lumps! Tip for pumpkin purée left over is to have it as soup or baked oatmeal and pumpkin pie as examples.
Add milk, pumpkin purée, maple syrup/honey, melted coconut oil and egg to a bowl and then whisk to combine.
Add the rest; oats, almond flour, chia seeds, yoursuper yellow mellow mix, baking powder, baking soda and salt, then stir to combine.
Pour batter into prepared baking pan.
Bake for 35 to 40 minutes in the oven for 180 degrees.
Cool them before slicing into bars and then store in the refrigerator.
The bars are gooey and tasting even better the day after, so have the patience to wait if you can! A tip is to make them the evening before and leave the bars in the fridge overnight.
To get yoursuperfoods mix to make these pumpkin mellow yellow oat bars, use my code MELANIESTOKKE for a 15% off!
Hope these healthy bars will set an end to your hunger strikes and keep you fueled throughout the day.
Wondering what to eat for a quick snack when feeling hungry? The answer is no bake matcha bars! These are healthy, vegan, gluten-free and refined sugar free. And they got a superfood ingredient… Matcha! I’ve used “power matcha” superfood mix from https://yoursuper.eu and it’s definitely a favorite of mine. Use my code MELANIESTOKKE for 15% off. What are you waiting for? Buy the superfood mix with my discount code and treat yourself with these healthy snack bars!
The process of making the matcha bars is super easy. There is no baking time in the oven on them and they are made with few ingredients. So here’s a shout-out for those at you at home who claim they cannot bake… This is truly your time to shine at the kitchen!
Ingredients
• 1,5 tsp power matcha
• 12 pitted medjool dates
• 2 dl oats
• 0,5 dl shredded coconut
• 3 dl cashews
• 2 tbs coconut oil
• 1 tsp lemon juice
• A pinch of salt and a touch of cinnamon
Instructions
1. Put all of the ingredients in a food processor until you’ve achieved a sticky dough
2. Line a baking pan or a form with parchment paper. Press down evenly the dough.
3. Refrigerate before cutting the bars and add toppings like cacao nibs and coconut chips.
Add all ingredients in a food processorPulse until you’ve achieved a sticky doughNo bake matcha bars refrigerated topped with cacao nibs and coconut chips!The mixture makes 10 bars.
It’s weekend and it’s time for a sweet treat! And these healthy cookies are the answer!
This recipe I found from @thebigmansworld being the best healthy cookies searched on Pinterest.
Was that right? BIG YES!
Recipe:
• 2 cups blanched almond flour
• 1/4 cup corn starch
• 1 tsp baking powder
• 6 tbs maple syrup
• 2 tbs coconut oil
• 1/4 cup almond milk
• 1/2 cup dark chocolate chips
Instructions:
1. Preheat oven to 175 degrees.
2. In a bowl mix your dry ingredients.
3. In a saucepan, combine your maple syrup and coconut oil and heat until melted.
4. Add the syrup/coconut mixture to your bowl along with almond milk to mix well with your dry ingredients. Fold in the dark chocolate chips but be careful not over mixing it.
5. Form balls with the cookie batter on a line of parchment paper. Press them down so they become a cookie;)
6. Bake for 12 minutes and let them rest so that they keep their shape!
Enjoy these ones without guilt, I mean it, you will seriously enjoy them so so much.
Such a good treat with delicious spices of autumn feels
Ingredients
• 80 soaked and pitted dates or I’d guess around 0,5 kilo/500g
• 4 dl walnuts
• 3-5 dl gluten-free oats depending on the chewiness & stickiness you like
• 2 tbs “yoursuper mellow yellow”
• 2 tsp cinnamon
• 5 generous tbs peanut butter
Instructions
Firstly soak your pitted dates in warm water until soft, then simply put all the ingredients in a food processor.
When you’ve achieved a smooth consistency, then shape the dough into balls and cover them with shredded coconut.
Voila and they are ready for you to eat them!
Leave them in the fridge to store them:)
The process of making them step by step
Soaked pitted dates and walnutsGluten-free oats, peanut butter and mellow yellow powder plus cinnamon The desired smooth consistency Shape the dough into balls and cover them with shredded coconutThe end result!
Hope you enjoy these as mush as I do! They have a lovely spice to it, is anti inflammatory and gives you an energy boost. The perfect treat or snack when hungry or craving sweet. These mellow yellow energy balls are gluten-free, dairy free, vegan and refined sugar free!
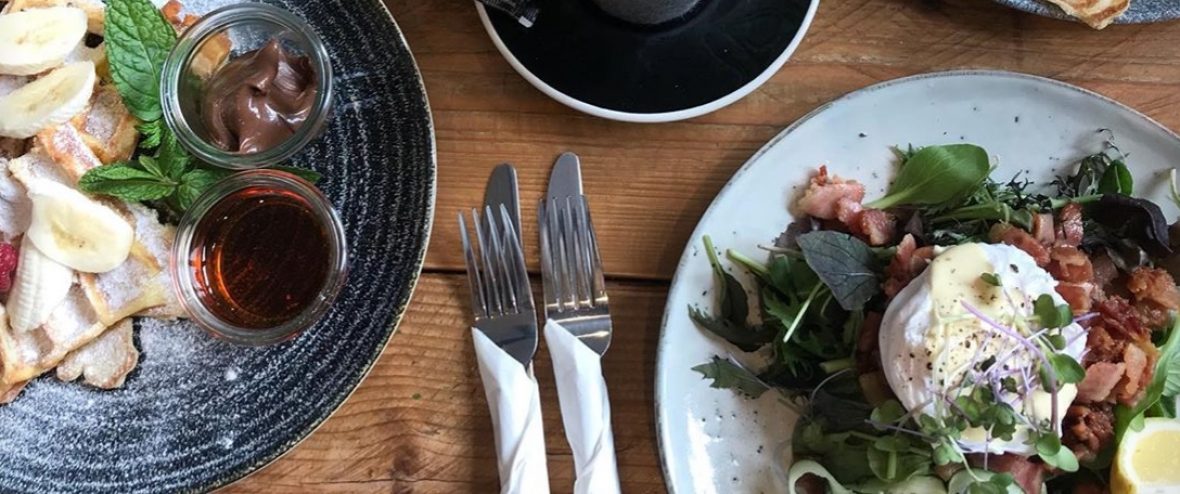
I absolutely love waffles, I mean who doesn’t? So I wanted to make them healthier and with fruity toppings giving you that summer feel! This recipe is with eggs, no sugar, without dairy and made with less gluten. These waffles I actually made in June but forgot to post them. However, I’m not too late as we get to enjoy summer a bit more and these waffles goes with it. Be prepared for another waffle recipe too as I want to make them next time without eggs being vegan friendly:)
Ingredients
• 100g oats
• 150g buckwheat flour
• 125g whole-wheat flour
• 4,5 dl almond milk or any other kind of plant based milk
• 50g coconut oil
• 1 tsp baking powder
• 1 tsp cinnamon
• 3 eggs
Instructions
1. Whip the eggs first.
2. Then add all the flour, oatmeal, baking powder and almond milk to a smooth mixture.
3. Finally add melted coconut oil and buckwheat flour.
4. Let the batter swell for 30 minutes.
5. Pour a scoop into the waffle maker and they are finished when having a golden light brown color!
6. Enjoy your healthy summer edition waffle and add whatever toppings you love. My favorites are homemade raspberry jam (in a heated pot add frozen raspberries till they are cooked done, if you want it sweeter add some honey or maple syrup), nectarine, slices of banana and apple, dark chocolate chips, coconut flakes etc. Oh and don’t forget to drizzle some peanut butter and honey/maple syrup. Go all out, rooting for you to do that, I promise it will put a smile on your face.
Hot summer days in Norway makes me crave watermelon and so I ended up making a pizza version of it! Now when the temperatures are at 30 degrees, it’s crucial to be hydrated. This watermelon pizza will definitely help you out with that. Cheers to summer, sunny days and this watermelon pizza!
Ingredients
• Watermelon
• Cherries
• Dried mango
• Mint leaves
• Dark chocolate
• Nut butter
• Pecan nuts
Instructions
1. Cut watermelon into pizza slices.
2. Remove the stones from the cherries and cut them into halves.
3. Add dried mango bits and mint leaves.
4. Spread some pecan nuts, nut butter and grate the dark chocolate to finish!
MmmmmmColorful and tasty, and it’s pretty to serve if you wonder what to make for a summer party!
Watermelon keeps you hydrated, contains antioxidants like dark chocolate also do, that contributes with vitamin C which helps prevent cell damage from free radicals. This refreshing fruit also has cucurbitacin E, a plant compound with anti inflammatory effects! And so do cherries! It’s a reason why we need to eat more plant based right? Cherries are a good source of fiber and potassium, which keeps your digestive system healthy and helps you with muscle contraction. For athletes and active people especially, this is a super fruit as it may help relieve exercise induced muscle pain, damage and inflammation!
Luksussjokolade kake from the recipe book “Rågodt” by Tiril Refsum
I absolutely adore the idea that there is a healthier version of cake since I have a sweet tooth. A person I admire is Tiril Refsum who makes raw cake with healthy ingredients and without refined sugar. They are gluten-free and vegan, and they taste amazing! So therefore, I had to try making a raw cake for the first time. I found the perfect recipe translated to English: luxurious chocolate cake. The name already said everything, I had to make it. The perfect occasion for it, was the celebration of 17th of May, Norwegian’s constitutional day. I was so happy by the response I got from friends and family, they loved it! So here is the recipe with some ingredient adjustments and I hope you’ll bake it with success like I luckily did hehe.
Ingredients
Cake base
• 3 dl oats
• 1 dl almonds
• 3 tablespoons peanut butter
• 4 tablespoons cacao powder & 2 tablespoons brown sugar
• 13 medjool dates without stones
• 1/2 teaspoon salt
• 1/2 teaspoon vanilla powder
• 2 tablespoons maple syrup
• 2 tablespoons coconut oil
Espresso cream
• 4 dl coconut cream
• 4 dl soaked cashews
• 3 cups espresso
• 4 tablespoons maple syrup or honey
• 1/2 dl melted coconut oil
• 1/2 teaspoon vanilla powder
• 1/4 teaspoon salt
Chocolate cream
• 4 dl coconut cream
• 15 medjool dates without stones
• 2 cups espresso
• 2 dl cacao powder
• 1 dl melted coconut oil
• 2 tablespoons brown sugar
• 3 tablespoons maple syrup or honey
• 1/2 salt
Caramelized nuts
• 2 dl pecan nuts
• 1 dl almonds
• 1 dl walnuts
• 4-6 tablespoons of brown sugar
• 2 tablespoons maple syrup or honey
Instructions
1. First you need to soak your cashews. Simply put them in a bowl with water for 4 hours or you can leave them in the fridge overnight.
2. Make your first layer, the cake base by adding all the ingredients in a food processor. After you have mixed them throughly, add some more syrup or coconut oil if you need so that the texture is sticky to form the cake base. Press the batter with either your fingers or a spatula on a round cake mold with baking paper.
3. Next layer up is the espresso cream. With the coconut oil, you just need to melt it either by microwave or heated pot. Let it to rest a bit. For the espresso, leave it for cool down so it’s not too hot mixing together with the other ingredients in the blender. Here you need to use a smoothie blender to achieve a silky consistency due to the cashew nuts, since it can be grainy if not well blended. Spread half of the cream over the cake base and put it in the freezer till the cream has set.
4. Do the same process with the chocolate cream! But here it’s good enough using a food processor to achieve the silky creaminess! Spread half of the chocolate cream over the espresso cream layer and put the cake back into the freezer.
5. Have all the ingredients to the caramelized nuts in a bowl and stir until it sticks well together. Spread 2/3 of the nutmix over the last layer. Then spread the rest of espresso layer on top and put the cake back in the freezer to everything has stiffened.
6. Lastly spread half of the chocolate layer left and finish with the remaining caramelized nuts. Put the cake back in the freezer for at least 2 hours. And when the cake layers have settled you can have it in the fridge so that it becomes more like a mousse texture rather than ice!
Tip: you can have chocolate chunks or cacao nibs on top too! And a cup of coffee with it for the coffee lovers will make the dessert complete:)
Enjoy x
Step 2: the cake base, mixing all ingredients in a food processor Step 3: making the espresso cream layer in a smoothie blenderStep 5: spread out 2/3 of the caramelized nuts on top of the chocolate cream layerLast step: spread the rest of the caramelized nuts on top and it’s done!
Even though it’s a long process to make the cake and will take you up to 3-4 hours letting the cake settle in the freezer in between, it’s all worth it in the end. The cake taste like heaven.
These treats are perfect as snack or when you’re having a sweet tooth! Healthy and tasty, they’re so good. You just need some dates, nut butter, coconut oil, buckwheat flakes and for flavor cacao and coffee powder! Put that in a food processor, roll them in chopped almonds and shredded coconut and keep them refrigerated.